Monday, 27 April 2015

Daring Bakers - April 2015!

It is the 27th today and I am supposed to post my take on this month's challenge. I am not really looking forward to this, though...

But first thing's first.

This month our challenge was to make Focaccia and our hosts were Rachael of pizzarossa and Sawsan of Chef in Disguise.

 I wanted to make a gluten free sweet focaccia, so I chose the basic recipe and left out the spices.

Sweet Focaccia

385 gm all-purpose gluten free flour
6 gm salt
15 gm white sugar
15 gm confectioner's sugar
8½ gm active dry yeast
1/2 tsp salt
15 ml vegetable oil
300 ml milk
chocolate sprinkles

white sugar
chocolate chips
butterscotch chips
cinnamon

* Warm the milk and mix it with the yeast and sugar and wait until it becomes foamy and bubbly.
* Stir together the flour, salt and confectioner's sugar
* Mix in the vegetable oil, then add the milk-yeast mixture.
* Stir until the dough comes together and then knead until smooth and elastic.
* Lightly oil a large bowl, place the dough in and turn to coat it with oil.
* Cover it with a damp cloth and let it rise in a warm place until it is doubled
* Preheat oven to 230°C.
* Deflate the dough down and place it on greased baking sheet. Pat into a thick circle.
* To give the dough the dimples effect, use your fingertips, pushing gently all over the surface of the dough.
* Lightly oil it with a brush and sprinkle your toppings.
* Let it rest for 10-15 minutes.
* Bake for about 15 min.

This process, as I have described it above is the theory.
The outcome? Well, I don't know what went wrong, because my dough didn't rise at all, even though the yeast was OK. I had purchased it that same day and it did foam.
I always, always help my yeasted doughs rise, using my neck warmer(!!) with a lot of success. Not this time...

So, I simply made a round shape with my hands, placed the toppings and baked.
It didn't rise at all, even during baking.

When I cut it, it was bread-y, not very sweet (as I suspect a sweet bread should be), but since there was no rise, this focaccia was dry.
Naturally we didn't like it and I ended up eating the chips from on top the focaccia.

Anyway, these are my pictures...


To tell you the truth, I didn't try to make it again. I was a bit disappointed and didn't want to waste any more ingredients...

I guess better luck next time?


Louise

Saturday, 28 March 2015

Daring Bakers - March 2015!

After quite some time, I managed to take part in this month's challenge.

Our host was Korena from Korena in the Kitchen.

The chosen recipe for March was "Tart Tatin".

I must admit that it was something I wanted to make for a long time, but somehow never did make one. We had to make our own pastry, as well! Great challenge, indeed!

I decided to make a sweet tart tatin, using fresh strawberries. The pastry is lovely and buttery AND gluten free!

Strawberry Tart Tatin - gluten free

for the pastry:

125 gr all-purpose gluten free flour
140 gm unsalted butter, cold
¼ tsp fine salt
vanillin
40 ml ice cold water
20ml milk, cold

for the filling:
adapted from here

fresh strawberries (enough to fill the bottom of the pan)
60 gr butter
100 gr white granulated sugar
2 tbsp water
vanilla bean (the seeds)
vanilla essence
chocolate sprinkles
 

* Preheat the oven to 190oC.
* Combine the flour, vanillin and salt.
* Cut the butter into small cubes and add it to the flour.
* Knead with your hands until the mixture is (wear plastic gloves!).
* Pour in the cold liquids.
* Knead together with a fork until the dough starts to clump together.
* Turn the dough out onto a floured work surface and knead just enough to bring it together into a square.
    Do not overwork the dough.
* Flour the rolling pin and roll the dough out into a rectangle.
* Fold the bottom third of the dough up into the middle, and fold the top third down, like you are folding a
   letter. This is one fold.
* Turn the dough, so that one of the open edges is facing you, and roll out again into a rectangle.
* Do this for  5 folds total.
* Wrap the dough in cling film and chill in the fridge. I myself left it only 30min. (I am not very patient!!!), but
   if you want 1 hour to overnight is better.


I chose to use a square glass baking dish.
* Butter the bottom of the baking dish and arrange the strawberries, cut in half. Let it aside.


* Place the butter, sugar and water in a frying pan over medium heat and stir until the sugar has dissolved.
* Bring to a boil and cook for 5 min.
* Pour the caramel over the strawberries.


 the liquid you see is my homemade vanilla essence, using vodka as base.


(I did crumble some brown sugar on top, just for the smell and the colour!!!)
* Take the dough out of the fridge.
* Roll it out on a lightly floured surface to the size and shape of the pan.

* Lay it over the filling and cut it here and there to release the steam.
* Bake for 35-40 min, until the pastry is puffed and golden brown.

 the dough is soooo smooth and silky....


* Take it out of the oven, wait 5 min. and invert it on a serving platter, larger than the baking dish.
    BE CAREFUL it is HOT!!!
* Add as many chocolate sprinkles as you wish and enjoy!


A truly amazing dessert! We all loved it and of course I am going to make it again... It is so easy!
Also, if you don't have the time or the mood, buy a ready made puff pastry and you can make it just as good!

I do intend to make a savoury one, as well. I am intrigued by this idea and will probably make it, using onions, potatoes, sweet potatoes....


Great great challenge!

Thank you Korina!


Louise.

NOTE: I am using gluten free flour, not because I cannot tolerate gluten, but because I think it is healthier. Therefore, I do not pay attention to whether there are gluten traces in my other ingredients, i.e. the chocolate sprinkles are not gluten free. So, if you do have a problem with gluten, just use all gluten free certified ingredients!

Thursday, 5 March 2015

"Welcome Baby" Sugar Cookies!

A very dear friend of mine gave birth to a little baby girl. I did buy a present for the baby, but I wanted to make something special and sweet for her as well.

Sugar Cookies (!!!) in the theme of a new baby!

I used my trusted recipe for sugar cookies and I decorated them with royal icing, for which I used raw egg whites. Of course I kept them in the fridge, which made them a little hard, but I don't like the taste of meringue powder......
I cannot remember now how many seconds was the consistency of the RI, I think it was 15 - 20 sec., but it was one, because I like outlining and flooding with the same consistency, so as not to have distinct borders. 

For the shapes I printed and cut templates, because I couldn't find cookie cutters in a short period of time.

Before I start decorating, I make sketches, so as to have the image in my mind.

(excuse the pictures, it was late at night, because decorating cookies and dealing with a 5 year old in the kitchen don't go well together...)
I chose a purple and white colour scheme. Pink I don't like so much....
I chose the heart, the baby bottle, the onesie, the play cubes and the word BABY!


I must admit that it was the first time I made such elaborate designs and I liked how they turned out!


Louise

Friday, 30 January 2015

Rainbow Sky bedding!

I had in my mind, for quite some time a certain project for pillows and cushions for Ioanna's bed.

The idea was the sky, with a sun, a rainbow, clouds and drops of rain!

The pale blue sheet is the sky and I sewed all the little pillows.

I printed in A3 paper a couple of cloud templates and used them to cut the white fabric, so I ended up with two clouds, one small and one large.

The drops I drew freehand, as the sun.

The rainboy was a bit trickier, in that I wanted to make the colours with satin ribbons. I cut a white rectangle and sewed the ribbons on one side and let them hang. Then I cut the back side of the pillow and sewed it together.

I filled them, closed them and there you have it! It took me about one morning to make them all. Of course she wasn't home...


It was a big surprise when she returned! She loved her bed! Especially the rainbow pillow. She likes to hug it and sleep with it under her arm!


Louise!

Wednesday, 14 January 2015

Orange Tahini Spritz cookies! - gluten free

Happy New Year!

It has been about a month.... Well, I was busy during the Holidays, both at home and at work (the busiest time of year actually!).
I, of course, baked. As I always do!

Oh, this recipe is a lovely twist on my basic sugar cookie recipe...

You will love it!

Tahini and orange... Well, this is a combination you just can't go wrong with!

I took my basic recipe and added 2 tbsp natural tahini, the zest of 1 orange and orange juice. For the juice part, I used 3 tbsp, because I wanted the cookie dough to be looser than usual, since I wanted to use it through a spritz cookie press.

Another thing is that I made them gluten free and therefore baked them a little longer, than the wheat flour sugar cookies.

If you want rolled cookies, just use the orange zest, the tahini and maybe a teaspoon or two of juice, in order for the dough to be a bit firmer.

Also, you may be able to find orange flavoured tahini and use that!


I dusted some with icing sugar! They are gooood!


No matter how you choose to make them, the taste of these cookies is out of this world!


Louise!

Tuesday, 16 December 2014

Golden vanilla cake with honey curd & cream cheese frosting!

After baking a rainbow birthday cake and frosting it, I ended up having a lot of egg yolks left.

I have found a recipe for a Golden Cake, that uses egg yolks.

Well, I have no words... It is the tastiest, moistest vanilla cake I have ever had. Every one loves it and it pairs so good with cream cheese, orange, vanilla, honey, lemon, .... you name it!

Golden Cake 

The recipe for the cake is from the very talented Summer at Cake, Paper, Party. Generally I use it as it is given, but this time I changed it a bit: 9 yolks and 1 egg.

Honey Curd

300gr honey
2 yolks
zest of 1 lemon and 1 orange
orange juice from 1/2 orange

* Put all the ingredients in a small pot.
* Stir gently over medium heat.
* Keep stirring.
* It will thicken a little, but it will still be runny.
* Put it in a jar and let it cool.
* Once cool, put it in the fridge and it will thicken up.
* Use in a tart, on a cake or eat it with a spoon....

Cream Cheese buttercream frosting
recipe inspired from here

250gr cream cheese
250gr butter
vanilla or vanillin
600gr icing sugar
a few drops of lemon or orange juice

* Beat butter and cream cheese.
* Add the vanilla (as much as you want, I use vanillin).
* Add the icing sugar gradually.
* Adjust for thickness.

So easy!


This one is a little blurry, but you have to see this honey curd oozing.... OMG!!
I cut this small cake in the middle to add even more frosting and honey and get an even better bite each time!

It has to be one of the most successful and tastiest cakes I have ever made!


Louise.

Note: these layers freeze so good! You simply thaw them on the kitchen counter completely and they are ready to use!

Thursday, 4 December 2014

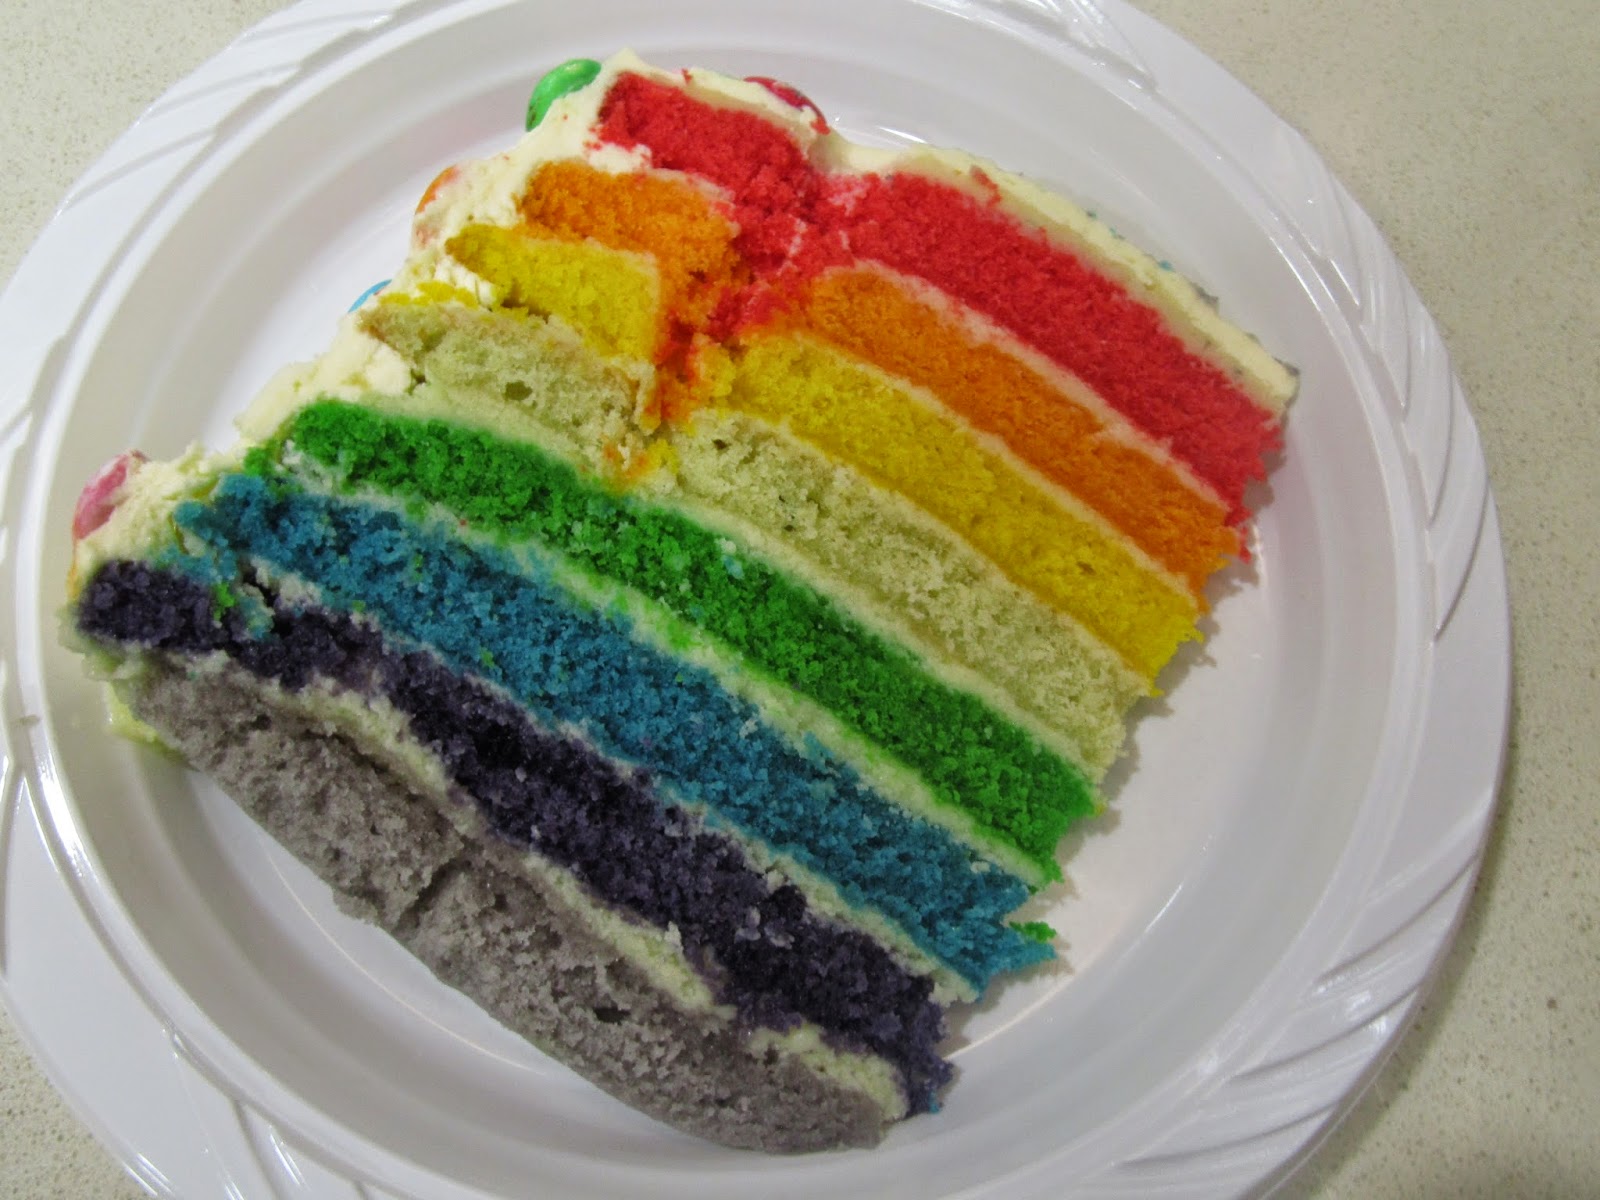
Rainbow Birthday Cake!

My little nephew turned three a couple of days ago and his request was a rainbow cake!

It is a cake that I had tried only once before with little success, so I was a bit intimidated. It took some planning and research and going back and forth to the store for butters, but I think I did it!

Rainbow Birthday Cake

for the layers:
White Cake
recipe slightly from the talented Summer of Cake, Paper, Party

Even though you can achieve the coloured layers with a classic egg batter, I wanted to be certain that the colours would be exactly as I had imagined them. So I made a basic white cake, using only egg whites.

The quantities are tripled (from the original) to make a round tall cake 28x15cm with 8 layers.

510gr butter
180gr olive oil
1000gr white granulated sugar
15 egg whites
5 tsp vanillin
870gr all purpose flour
70gr corn starch
2 tsp salt
6 tsp baking powder
720ml whole milk

* Preheat the oven to 165oC.
* Line the bottom of the pans with parchment paper.
* Mix on low the butter, oil and sugar until combined, but not light.
* Add the egg whites and mix on low until just absorbed.
* Add vanilla on low.
* Sprinkle in the dry ingredients and mix on low until just moist.
* Add gradually the milk on low and then mix on medium until well blended.
* Divide the batter into 8 small bowls and colour them.
* Bake them about 25min. until a toothpick comes out clean.
* Let them cool.

The layers will be thin.

for the filling:

I prepared a simple buttercream with almond flavor.

800gr (about) icing sugar
400gr (about) butter
2 tsp almond extract

* Beat everything together and adjust for desired thickness with a little milk.

for the covering:
I made Swiss Meringue Buttercream with almond extract, using my favorite recipe from Sweetapolita.

5 large egg whites
250gr white sugar
340gr butter, cubed, cool
2 tsp almond extract
pinch of salt

* In the metal bowl of a mixer, put the egg whites and the sugar and place it over a pot with simmering water.
* Whisk constantly and gently until the mixture reaches 71oC. This takes about 10-12 min.
* Remove the bowl and start whisking in the mixer, until the meringue is glossy and the bowl is room temp.
* Using the paddle attachment start adding the butter, one cube at a time.
* It will curdle, but keep beating. It will come together!
* Add the almond extract and beat a little more.


(excuse the lighting...)


Assembly:
Follow the colours of a rainbow!
I started with the lilac on the bottom, purple, blue, green, light green, yellow, orange and red. In between I piped a very thin layer of buttercream.
I let the cake in the fridge to firm up, before covering it, because the layers started to slide. I also inserted 4 dowels.
I covered the outside and decorated it with small candy in the matching colours.


 You can see here that the dowels are drinking straws.

Great taste, very very moist cake! Everybody loved both the taste and the colours!

The little kids went crazy!!!!


 Happy Birthday to my little nephew!


Louise.

** As for the many many egg yolks, well, the next post will be about it....