This is our last challenge for 2012...
Right in time for Christmas, our host Marcellina from Marcellina in Cucina chose a fine recipe for Panettone.
I have to admit that at first I was sceptical, because the ready made Panettone you can find in a super market is not very tasty, at least to me.
My husband likes it very much, though, so he was more thrilled for the challenge than me.
Well..... I am never buying panettone again!
This recipe is so good, that I will make it a Christmas standard. I really liked it. It is tasty, fragrant, dense.... I loved it and so did my husband.
I cut my dough in 4 pieces.
I filled 3 with cranberries and white chocolate chunks and I filled 1 with almonds, walnuts and cinnamon.
I don't have special panettone pans, so I used formula cans, which I lined with parchment paper.
There are only 3 shown here, because we ate one practically from the oven!
.
The almonds - walnuts panettone I dusted with confectioner's sugar!
Marcellina thank you for this challenge!
You managed to change my opinion on panettone.
It has been a wonderful year and I cannot wait to see what recipes 2013 will bring us!!!!!!
between baking, child raising, working and house keeping... a girl must do everything with style!
Thursday, 27 December 2012
Monday, 17 December 2012
Survival Kit for a new mom!
A friend of mine was about to have a baby some time ago.
I didn't want to buy something for the baby just yet, so I thought it would be a good idea to give the new mom a little something.
We will give a present to the baby later, now it is the moment of the mom!
A hospital survival kit sounded like a nice present, which I made myself.
I was inspired by my own experience at the hospital and what I thought was necessary for me.
So I put in the bag a hand cream, a hand sanitizer, a nail file, a nail polish in a nude colour, caramels, make up remover wet tissues, a couple of healthy bars, earplugs, a lip moisturizer, a hair band and some elastic bands.
Since she was having a boy, I kept the colours at a "boy" theme.
Thankfully she liked it!
She had a healthy little baby boy and we are all so happy for the new parents!!!!
Friday, 14 December 2012
Office Outfit of the week!
Labels:
American Vintage,
Cole Haan,
Denham,
fashion,
gucci,
J.Crew,
Louis Vuitton,
Montblanc,
polyvore,
style,
tous
Thursday, 6 December 2012
"New" blouse!
I have a few blouses from Zara, all the same model, but in different colours.
When I find an item that fits well and I like it a lot, then I try to buy more than one piece.
This particular top has a V-neck, no sleeves and it is draped in front. I have it in white, black, grey, red, beige, light blue, blue... (it also covers some problematic areas....)
When my white one got a bit worn, it showed on the neckline. So, instead of throwing it or using it as a duster, I thought why not up-cycle it?
This is what I did:
This is my grey top, just to show you how the neckline was originally.
This is my finished white top.
I sewed a black transparent ribbon all around, with black thread. Then I got whatever I had around, but in a certain colour group.
Using thin satin ribbons I made flowers and placed here and there beads in several sizes and colours. Also, I added a piece of leather lace!
A little closer for details.
It is easy, plain, simple and it totally transformed my top!
I don't like throwing things away. I always try to think of ways to re-use them!
Tuesday, 4 December 2012
Choc Chip ..... Sugar Cookies!!!!!!
I have a passion for sugar cookies ...
If someone asks me what do you want for dessert, I will say sugar cookies. No cake, no mousse, no nothing, only these lovele buttery vanilla (most of the times!) smelling cookies!
This is what I made a few days ago.
.
Chocolate Chip cookies + Sugar cookies = What is there not to like?
I used dark chocolate chips, but next time: MILK chocolate chips!!!!!
Do these come in Atkins? (I am crying right now...)
Friday, 30 November 2012
Office Outfit of the week!
Labels:
Diane von Furstenberg,
fashion,
gucci,
J.Crew,
Louis Vuitton,
Mango,
Montblanc,
polyvore,
style,
tous
G's Birthday!
Although his birthday was in October, I just had to post this, because of the cake.....
Chocolate Birthday Cake, that is, with milk chocolate ganache and italian meringue, aka Marshmallow fluff!!!!
I used a recipe I found on the King Arthur Flour site, slightly adapted.
Milk chocolate layer cake
for the cake:
110gr butter
140gr white sugar
2 eggs
200gr melted milk chocolate
1/4 tsp salt
300gr self rising flour
1 1/4 baking soda
2 tsp vanilla
20gr dried milk
25gr plain cocoa powder
220gr buttermilk
for the ganache:
350gr milk chocolate
200gr cream
for the italian meringue:
170gr white sugar
100gr corn syrup
55gr water
2 egg whites
1/4 tsp cream of tartar (I use it whenever I make any kind of meringue)
2 tsp vanilla extract
cake:
Preheat the oven to 180°C and butter and flour your chosen pans.
ganache:
Chop the chocolate and put it in a bowl. Heat the cream gently and pour it over the chocolate. Let it stand for 5 min and then start mixing it with a spatula. Once there are no lumps and the ganache has cooled a bit, put it in the fridge, while you make the cake.
italian meringue:
Stir together the sugar, corn syrup, water and salt in a saucepan over high heat. Bring to a boil, stirring occasionally, until the mixture reaches 116°C on a candy thermometer.
Place the egg whites and cream of tartar in the bowl of a stand mixer fitted with a whisk attachment. Whip the egg whites to soft peaks. The egg whites should be ready, waiting for the syrup to be drizzled in.stop the mixer until the syrup is ready.).
When the syrup the right temperature, lower the speed of the mixer (meringue) and slowly drizzle about 2 tablespoons of syrup into the egg whites to warm them. DO NOT add too much syrup at once or the egg whites will scramble and what you need is a satin creme, not an omellete. Slowly drizzle in the rest of the syrup. Increase the speed to medium high and whip until the marshmallow crème is stiff and glossy. Add in the vanilla and whip 2 minutes more.
Now comes the fun part.
Assembly of the cake!
I had already decided on how many layers I wanted, so I leveled, measured and cut the cake to give me 3 layers.
Put the first layer on the platter and moisten it with a bit of simple sugar syrup or some liquer if you want.
Spread a thick layer of ganache.
Place the second cake layer, moisten it and spread the marshmallow creme.
Then the last cake layer. Moisten it and spread any ganache that remains. Also, if you have any marshmallow creme left, drizzle it on top. I finished it off with some milk chocolate shavings!
I didn't want to frost the cake. I thought the layers were prettier like that, to show the alternation of brown and white!
Apart from the Birthday Cake, I made a lovely Napoleon, as it was the October challenge for the Daring Bakers.
I also baked a couple of quiches and made a green salad with balsamic vinegar and figs.
Well, needless to say, the cake was a hit. I still get compliments!!!
We had a really great time!
Happy Birthday G!
Chocolate Birthday Cake, that is, with milk chocolate ganache and italian meringue, aka Marshmallow fluff!!!!
I used a recipe I found on the King Arthur Flour site, slightly adapted.
Milk chocolate layer cake
for the cake:
110gr butter
140gr white sugar
2 eggs
200gr melted milk chocolate
1/4 tsp salt
300gr self rising flour
1 1/4 baking soda
2 tsp vanilla
20gr dried milk
25gr plain cocoa powder
220gr buttermilk
for the ganache:
350gr milk chocolate
200gr cream
for the italian meringue:
170gr white sugar
100gr corn syrup
55gr water
2 egg whites
1/4 tsp cream of tartar (I use it whenever I make any kind of meringue)
2 tsp vanilla extract
cake:
Preheat the oven to 180°C and butter and flour your chosen pans.
Place the oil, butter, sugar, and eggs in the bowl of
your mixer and mix on medium for 2 min. Stop the mixer and
scrape down the bowl. Add the melted milk chocolate, salt, flour, baking soda,
vanilla, dried milk, cocoa powder and 1/2 the buttermilk.
Beat for 1 min. Scrape the bowl.Add the remaining buttermilk and beat for 30 seconds.
Pour the batter into the pans and bake for 25 min (I used a rectangular pan).
The cake is done when a toothpick inserted into the center comes out
clean, with just a few moist crumbs.Rest the cake in the pan for 5 min, then turn out onto a rack to cool completely.
ganache:
Chop the chocolate and put it in a bowl. Heat the cream gently and pour it over the chocolate. Let it stand for 5 min and then start mixing it with a spatula. Once there are no lumps and the ganache has cooled a bit, put it in the fridge, while you make the cake.
italian meringue:
Stir together the sugar, corn syrup, water and salt in a saucepan over high heat. Bring to a boil, stirring occasionally, until the mixture reaches 116°C on a candy thermometer.
Place the egg whites and cream of tartar in the bowl of a stand mixer fitted with a whisk attachment. Whip the egg whites to soft peaks. The egg whites should be ready, waiting for the syrup to be drizzled in.stop the mixer until the syrup is ready.).
When the syrup the right temperature, lower the speed of the mixer (meringue) and slowly drizzle about 2 tablespoons of syrup into the egg whites to warm them. DO NOT add too much syrup at once or the egg whites will scramble and what you need is a satin creme, not an omellete. Slowly drizzle in the rest of the syrup. Increase the speed to medium high and whip until the marshmallow crème is stiff and glossy. Add in the vanilla and whip 2 minutes more.
Now comes the fun part.
Assembly of the cake!
I had already decided on how many layers I wanted, so I leveled, measured and cut the cake to give me 3 layers.
Put the first layer on the platter and moisten it with a bit of simple sugar syrup or some liquer if you want.
Spread a thick layer of ganache.
Place the second cake layer, moisten it and spread the marshmallow creme.
Then the last cake layer. Moisten it and spread any ganache that remains. Also, if you have any marshmallow creme left, drizzle it on top. I finished it off with some milk chocolate shavings!
I didn't want to frost the cake. I thought the layers were prettier like that, to show the alternation of brown and white!
Apart from the Birthday Cake, I made a lovely Napoleon, as it was the October challenge for the Daring Bakers.
I also baked a couple of quiches and made a green salad with balsamic vinegar and figs.
Well, needless to say, the cake was a hit. I still get compliments!!!
We had a really great time!
Happy Birthday G!
Tuesday, 27 November 2012
Daring Bakers - November 2012
This month's challenge was ..... Cookies, Biscuits, Treats!!!!!
Twelve Days of Cookies....
Totally my kind of challenge! It was hosted by Peta from Peta Eats.
I decided to make recipe No 5: foaming cookies, using maple syrup. For the second recipe (we were asked to make one from Peta's and one of ours) I made sugar cookies... what else!
Maple Foaming Cookies
340 gm sugar
100 ml maple syrup
560 gm all-purpose flour
225 gm butter
1 teaspoon bi-carbonate soda
30 ml hot water
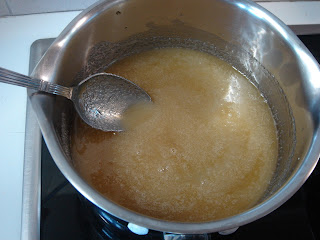
Preheat oven to 180°C. Rub the butter into flour until it looks like fine breadcrumbs or blitz together in a food processor. Melt the sugar and maple syrup together. Dissolve the bi-carbonate soda into the hot water. Add to the sugar/maple syrup mixture and mix quickly into the flour/butter until well combined.
The mixture will be rather runny and shiny.
When the dough has cooled a bit, make balls with your hands, put them on a baking tray and flatten them a little. The tray should be lined with baking paper. I always do that!
Bake for 10 – 15 minutes or until golden. Allow the cookies to cool slightly on the tray and then move to cooling rack.
There are many variations to this recipe. It is really versatile and you can use anything you want! Peta suggests, i.e. to add 2 tablespoons golden syrup or treacle, 2 teaspoons ground ginger, 1 teaspoon ground cloves and 1 teaspoon mixed spice for ginger cookies and even substitutions, i.e. gluten free flour or almond flour for plain flour, dairy substitutes for butter, water, juice or milk substitute for milk, etc..
.
Maple and sugar, yum!
Flour and butter...
Adding the bicarb. soda is really foaming...
This dough is shiny, tasty (!) and really easy to handle...
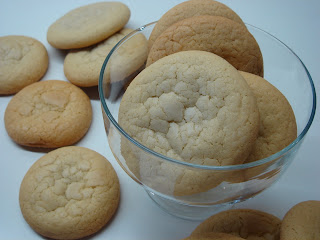
I like the end result. It is both tasty and pretty. Love the cracks on the surface!
.
I really wished I had more time to make more cookies and try new recipes. Also I wish I had the metabolism for it...
I am definitely making more. Peta provided 12 recipes of mouth watering cookies!
I didn't take any pictures of the sugar cookies, but you can have an idea here and here.
Thank you Peta!
Wednesday, 21 November 2012
Present presentation!!
When I make a present, I want it to be special (of course), but in a way that is personal to me and to the recipient.
I try to figure out what is best for the person in question a few days ahead and try to match it to their personality.
My personal touch on the matter is usually the wrapping / packaging. It has to be pretty and cute and strange and have a wow-factor about it.
When it was my sister's birthday, I got her a kaftan. It was gift wrapped at the shop in a bag, but I wanted something diferent. So....
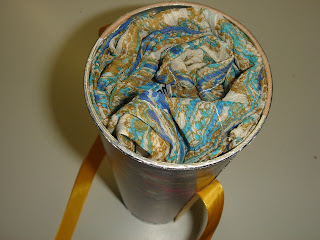
I bought a tube of Pringles (and washed it thoroughly)....
I have my wrapping paper ready, my scissors, double-sided tape and I begin...
I used the tape to cover the tube with wrapping paper. I left the lid as it was. (You can see the kaftan at the right top corner, blue, teal, olive green, beige, a hint of yellow... Love these colours!)
I used the tape to secure the yellow ribbon to the sides of the tube, put the kaftan in and then closed with the lid...
I added a Birthday Wish tag...
I tied a nice bow...
And there you have it!
She liked both the kaftan and the packaging!!!
Saturday, 17 November 2012
Office Outfit of the week!
Labels:
fashion,
Givenchy,
Louis Vuitton,
Montblanc,
Oasis,
Piazza Sempione,
polyvore,
Rick Owens,
style,
tous
Friday, 9 November 2012
Office Outfit of the week!
Friday, 2 November 2012
Office Outfit of the week!
Labels:
ballet flats,
denim vests,
fashion,
gey,
gucci,
Louis Vuitton,
Montblanc,
polyvore,
Reiss,
silver,
Splendid,
style,
tous
Monday, 29 October 2012
Daring Bakers - October 2012
I am two days late, I know.
Actually I was out of town for the weekend, so I am posting today...
This month's challenge was hosted by Suz from Serenely Full .
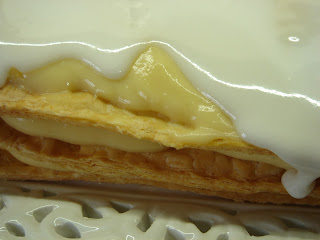
We had to make our own puff pastry and a mille-feuille or napoleon.
Well, that was a first for me! Never made puff pastry before and I can't say that I want to make it again... Sorry, my fellow Bakers, but I wasn't very happy with the end result of my puff pastry, even though my Napoleon was very tasty.
The pastry cream, on the other hand, was so good, I ended up licking the bowl!
I made a Napoleon for G's birthday celebration and our friends really liked it. The taste is very ellegant!
What I would change is this:
- I will buy fresh ready made puff pastry
- I will not use chocolate for the topping.
Let me explain what I mean by that...
I melted bitter chocolate alone and decorated the top of my dessert. When I tried to cut slices, the chocolate was hard (naturally), pressuring the Napoleon, making the cutting difficult and resulting in not so pretty slices. Next time, I will add some butter or cream in the chocolate, so that it is soft!
Making the pastry cream...
.
I covered it with cling film, so that there will be no crust on top.
I think I rolled the puff pastry very thin...
The pastry cream was very easy to handle and spread.
My RI is rather runny....
This is the end result!
Thank you Suz!
Friday, 26 October 2012
Office Outfit of the week!
Labels:
army,
black,
Bruuns Bazaar,
Dsquared,
dvf,
fashion,
gucci,
Juicy Couture,
Louis Vuitton,
Mesop,
Montblanc,
Oasis,
polyvore,
style,
Victorinox Swiss Army
Subscribe to:
Posts (Atom)


