Tuesday 16 December 2014

Golden vanilla cake with honey curd & cream cheese frosting!

After baking a rainbow birthday cake and frosting it, I ended up having a lot of egg yolks left.

I have found a recipe for a Golden Cake, that uses egg yolks.

Well, I have no words... It is the tastiest, moistest vanilla cake I have ever had. Every one loves it and it pairs so good with cream cheese, orange, vanilla, honey, lemon, .... you name it!

Golden Cake 

The recipe for the cake is from the very talented Summer at Cake, Paper, Party. Generally I use it as it is given, but this time I changed it a bit: 9 yolks and 1 egg.

Honey Curd

300gr honey
2 yolks
zest of 1 lemon and 1 orange
orange juice from 1/2 orange

* Put all the ingredients in a small pot.
* Stir gently over medium heat.
* Keep stirring.
* It will thicken a little, but it will still be runny.
* Put it in a jar and let it cool.
* Once cool, put it in the fridge and it will thicken up.
* Use in a tart, on a cake or eat it with a spoon....

Cream Cheese buttercream frosting
recipe inspired from here

250gr cream cheese
250gr butter
vanilla or vanillin
600gr icing sugar
a few drops of lemon or orange juice

* Beat butter and cream cheese.
* Add the vanilla (as much as you want, I use vanillin).
* Add the icing sugar gradually.
* Adjust for thickness.

So easy!


This one is a little blurry, but you have to see this honey curd oozing.... OMG!!
I cut this small cake in the middle to add even more frosting and honey and get an even better bite each time!

It has to be one of the most successful and tastiest cakes I have ever made!


Louise.

Note: these layers freeze so good! You simply thaw them on the kitchen counter completely and they are ready to use!

Thursday 4 December 2014

Rainbow Birthday Cake!

My little nephew turned three a couple of days ago and his request was a rainbow cake!

It is a cake that I had tried only once before with little success, so I was a bit intimidated. It took some planning and research and going back and forth to the store for butters, but I think I did it!

Rainbow Birthday Cake

for the layers:
White Cake
recipe slightly from the talented Summer of Cake, Paper, Party

Even though you can achieve the coloured layers with a classic egg batter, I wanted to be certain that the colours would be exactly as I had imagined them. So I made a basic white cake, using only egg whites.

The quantities are tripled (from the original) to make a round tall cake 28x15cm with 8 layers.

510gr butter
180gr olive oil
1000gr white granulated sugar
15 egg whites
5 tsp vanillin
870gr all purpose flour
70gr corn starch
2 tsp salt
6 tsp baking powder
720ml whole milk

* Preheat the oven to 165oC.
* Line the bottom of the pans with parchment paper.
* Mix on low the butter, oil and sugar until combined, but not light.
* Add the egg whites and mix on low until just absorbed.
* Add vanilla on low.
* Sprinkle in the dry ingredients and mix on low until just moist.
* Add gradually the milk on low and then mix on medium until well blended.
* Divide the batter into 8 small bowls and colour them.
* Bake them about 25min. until a toothpick comes out clean.
* Let them cool.

The layers will be thin.

for the filling:

I prepared a simple buttercream with almond flavor.

800gr (about) icing sugar
400gr (about) butter
2 tsp almond extract

* Beat everything together and adjust for desired thickness with a little milk.

for the covering:
I made Swiss Meringue Buttercream with almond extract, using my favorite recipe from Sweetapolita.

5 large egg whites
250gr white sugar
340gr butter, cubed, cool
2 tsp almond extract
pinch of salt

* In the metal bowl of a mixer, put the egg whites and the sugar and place it over a pot with simmering water.
* Whisk constantly and gently until the mixture reaches 71oC. This takes about 10-12 min.
* Remove the bowl and start whisking in the mixer, until the meringue is glossy and the bowl is room temp.
* Using the paddle attachment start adding the butter, one cube at a time.
* It will curdle, but keep beating. It will come together!
* Add the almond extract and beat a little more.


(excuse the lighting...)


Assembly:
Follow the colours of a rainbow!
I started with the lilac on the bottom, purple, blue, green, light green, yellow, orange and red. In between I piped a very thin layer of buttercream.
I let the cake in the fridge to firm up, before covering it, because the layers started to slide. I also inserted 4 dowels.
I covered the outside and decorated it with small candy in the matching colours.


 You can see here that the dowels are drinking straws.

Great taste, very very moist cake! Everybody loved both the taste and the colours!

The little kids went crazy!!!!


 Happy Birthday to my little nephew!


Louise.

** As for the many many egg yolks, well, the next post will be about it....

Tuesday 25 November 2014

Chocolate chip granola!

When it comes to the nutrition of my little one, I try to be healthy whenever I can and to the max!

In that mind-status, if I can make something myself, instead of buying at the store (cake, candy, bread, etc.), I go for it. Our pediatrician agrees, as well! 

The cereal you find at the super market are full of sugar and so many artificial "icky" stuff. I searched for a good, healthy and tasty recipe and luckily I stumbled upon a recipe from Michelle of Brown Eyed Baker, which I use as a base and alter, depending on our cravings!

Chocolate Chip Granola

70gr maple syrup
70gr brown sugar
20gr white sugar
3 tbsp vanilla
1/2 tsp salt
500gr oats
300gr chocolate chips
80 + 20gr olive oil

* Preheat the oven to 165oC.
* In a bowl mix maple syrup, sugars, vanilla and salt.
* Add 80gr olive oil and whisk until combined.
* Add the oats and the choc chips and stir with a spatula to coat, until the oats are moist.
* If needed, add the remaining olive oil.
* Prepare a pan with parchment paper and empty the oats in it.
* Press very firmly to compact (I use the bottom of a very small metallic coffee pot).
* Bake for 45 min.
* Once ready, elt it cool completely and then break it to pieces.


The taste is so good! We have it with milk, yogurt, but I personally prefer eating it as is, like candy!


As I said, this is my base.
I can add whatever we wish and the result is still amazing!

For example:
This is Chocolate Chip Cranberry Sprinkles granola (my little one loves sprinkles!).

 By the way this is how compact it needs to be, so that you can break it to pieces that hold their shape.


In this case, the dried cranberries add a nice acidic touch to the sweetness of the recipe.

Oh, yes... One day I made it, using white chocolate chips instead of dark ones... Well, I have no words! The best EVER!!!!

Enjoy!

Louise

Monday 10 November 2014

Pomegranate jam!

My mother-in-law gave a lot of pomegranates! Like 12 fruits!

We ate a couple fresh... Ioanna especially loves these little ruby seeds!

I still had a lot left, so what do I always do? I make jam!

Thankfully I have a Kenwood Breadmaker, which also makes jam.

I used fruit and sugar in equal quantities, a little lemon juice and a tbsp butter. Pressed the button and after 1 1/2 hours it is ready!


 It is very tasty and sweet, but not in a heavy sugary way.


I am already thinking of a semi sweet tart filled with this lovely jam, drizzled with cream cheese..

Enjoy!


** Note: If you want to make this jam in a pot, you can you these ingredients. Put them in a pot, bring to a boil and then lower the temp. You need to be near the pot, stirring constantly, because it can stick to the bottom and rise over the top of the pot! It is a more difficult process... Try it at your own risk and BE CAREFUL not to burn yourself!!!!


Louise.

Friday 7 November 2014

Playing with Barbie dolls !!! - 04

Well, it was only natural that I would make a doll house .....

I took an old used IKEA Billy bookcase and simply added furniture and shelves.


The kitchen is the bottom of a detergent box, covered with plain white paper and hand drawn by me. For the shelf I used white cardboard paper and defined the edges with a black marker.

 Snow White is baking!

 The beds are made from shoe box lids. I also made the matresses and the bed linen.


 I made the fire place myself!


I still want to add things, i.e. wallpapers, windows, a balcony, more shelves, etc., but you get the idea!

Ioanna loves it! (I love it too, I have a thing for miniatures and doll houses!)

Louise!

Thursday 30 October 2014

Daring Bakers - October 2014!

My post for this challenge is rather late. I should have posted 3 days ago, but there was something wrong with my Internet connection.. What can you do?

So, now that everything is alright, I am posting the October Challenge. Korena from Korena in the Kitchen was our host and she chose a lovely cake!

Sachertorte!

One of my very favourite cakes! It has been quite a while since I had it. I think it was a few years back, when we were on a trip to North Italy at the region of Südtirol. It is also what I have whenever I visit Austria and I always bring back home, as so far I haven't found anything matching the quality of the real thing here...

For this challenge I followed the given recipe, which I halved and made it gluten free.

Sachertorte

for the cake
90 gm bittersweet chocolate, chopped
65 gm butter at room temperature 65 gm confectioners’ sugar
3 large eggs, separated, at room temperature
1 teaspoon vanilla extract
50 gm granulated sugar
65 gm all-purpose gluten free flour
pinch fine grain salt

Apricot jam
Chocolate Glaze

* Preheat oven to 190˚C.
* Butter and flour of a pan, then line the bottom with a circle of parchment paper.
* Melt the chocolate ans set aside to cool completely, stirring often.
* Beat the butter in a bowl until light and creamy. Add the confectioners’ sugar and beat again.
* Beat in the egg yolks, one at a time, scraping down the sides of the bowl.
* Add the cooled chocolate and vanilla and beat until light and creamy.
* In a clean bowl beat the egg whites with one tbs granulated sugar on high speed until foamy. Gradually add the rest of the granulated sugar and continue beating until you get shiny peaks.
* Stir about 1/3 of the meringue into the chocolate mixture, then gently fold meringue with a spatula until just a few wisps of egg white remain.
* Stir together the flour and salt and add half of it to the chocolate mixture. Fold in with a spatula until almost incorporated. Add the rest flour and fold to combine completely.
* Spread the batter evenly in the prepared pan and bake for 45 min.
* Let it cool in the pan for 10 min, then carefully invert the cake onto a rack and remove the parchment paper, then turn the cake right-side up onto a rack and allow to cool completely.
* Turn the cake upside-down so that the perfectly flat bottom of the cake is now the top and cut it horizontally into 2 layers.
* Place 1 cake layer on a cake rack and spread it generously with apricot jam.
* Place the second cake layer on top and spread the top and sides with more apricot jam.
* Pour the chocolate glaze over the top of the cake. Spread the excess glaze to cover any bare spots.
* Write the word “Sacher” and chill the cake until the glaze is completely set.
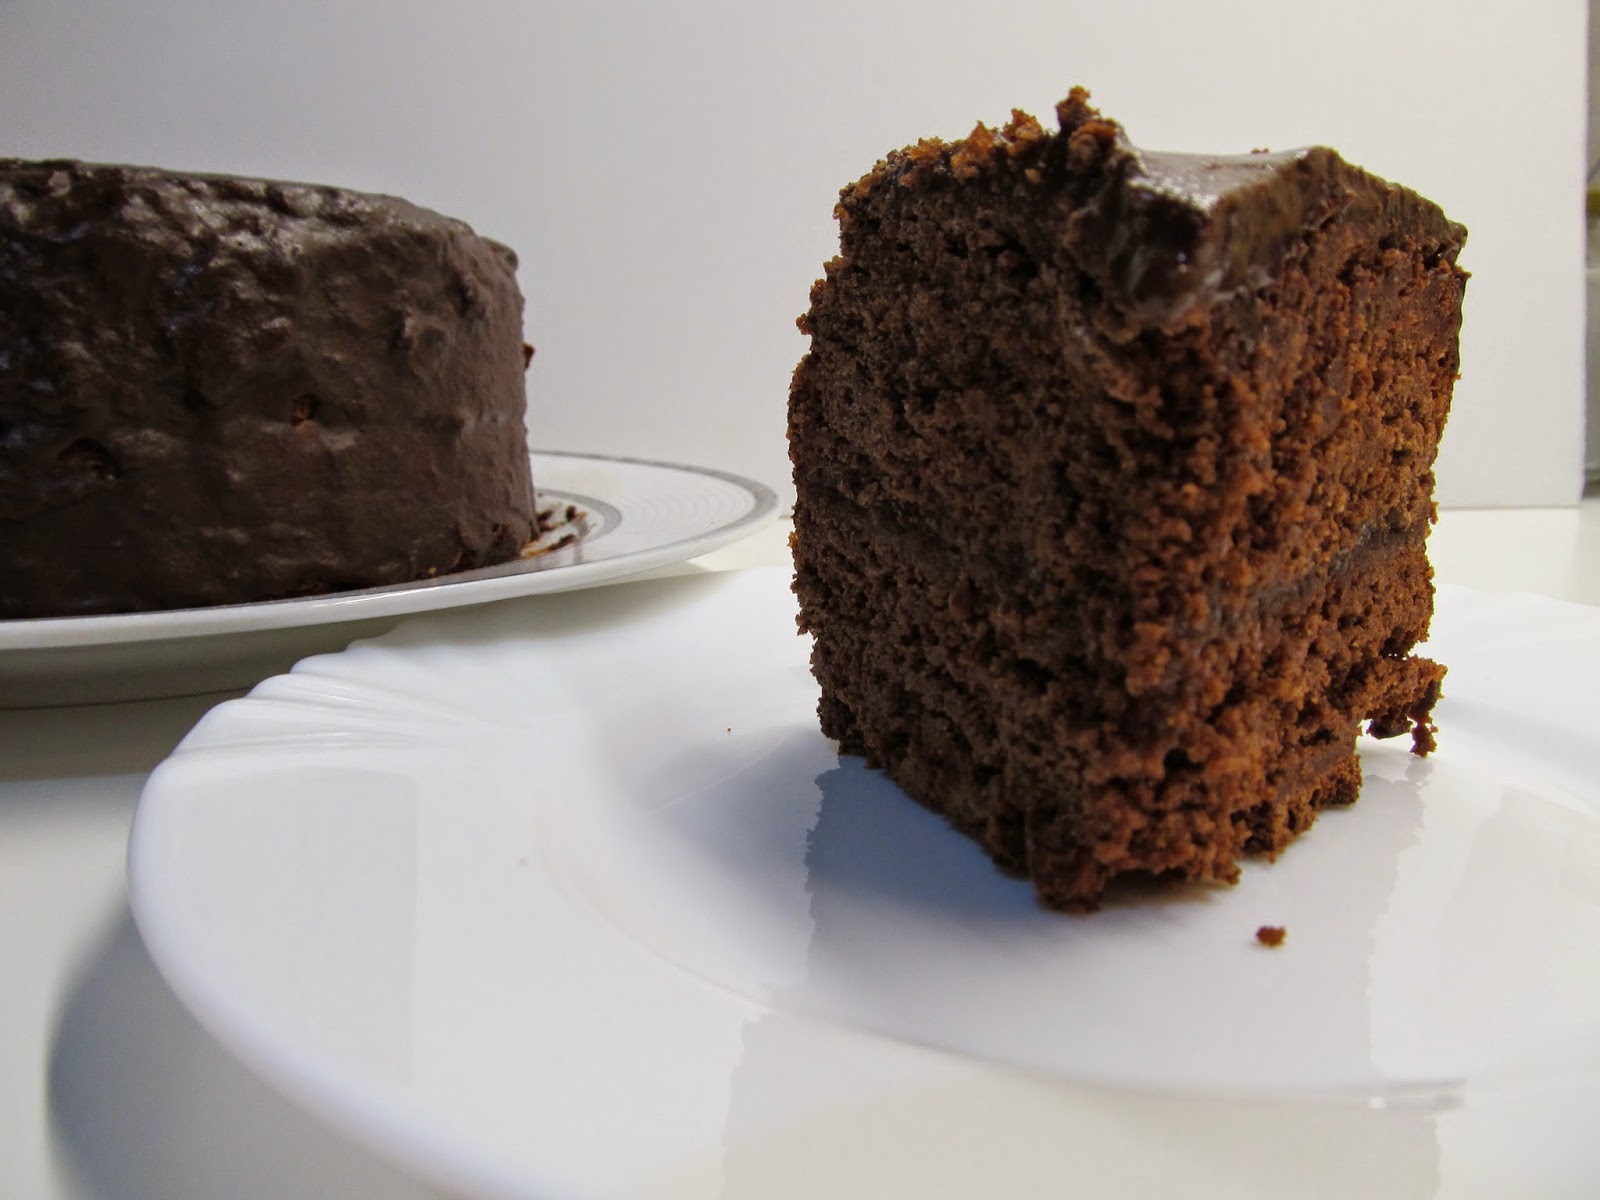
 Perfect shape!

Adding the apricot jam (yum!)


A few notes..
The given recipe for the chocolate glaze is this:
200 gr granulated sugar
120 ml water
115 gm bittersweet chocolate, chopped

* Place the sugar and water in a saucepan over medium-high heat and bring to a boil, stirring occasionally.
* Cook, stirring, until the mixture reaches 112°C.
* Remove it from the heat and whisk in the chocolate. It might thicken up quite a bit. If it does, return it to low heat and add a few drops of water if necessary to thin it out to a runny, pourable consistency. The glaze should be smooth and shiny.

Well, I followed it and the chocolate seized so much, that I had to add more than a few drops of water. But it still was not smooth. I tried to pour it on the cake and it was not good. It dried rock hard and was ugly.
In general I do not like to mix water with chocolate...
So I ended up making my own glaze with chocolate, butter and condensed milk. It was smooth and shiny and it poured great. I did try to smooth it, even if the first chocolate layer was anything but smooth...


I don't know if you can see it, but it is totally "grainy".

This is after I used my glaze. A lot better and smooth enough to "write" the word Sacher.


I wrote the word "Sacher" using letter stamps.

The cake itself is very tasty. It is indeed in the dry side, but still so so tasty!
Normally it is accompanied with a portion of schlag, unsweetened whipped cream, but we didn't want to, so I didn't make any!

(I love the lighting in this picture...)


I think I will make it again. It is the only way to enjoy a piece of Sachertorte, outside Austria!


Thank you Korena for this challenge and for reminding me this lovely cake!

Louise

Wednesday 8 October 2014

Hazelnut milk!

Usually in the morning I make a smoothie with non dairy milk, fruit and avocado.

At first I was making almond milk, but decided to try hazelnut milk, as well.

It is so much better!

The process is exactly the same, as with almond milk.

Hazelnut milk

* Soak the hazelnuts overnight (about 1/2 or 1 cup depending on your bottle).
* Strain them and put them in a blender.
* Add as much water as it is the capacity of your bottle.
* Blend very well.
* Use a cheesecloth to strain the mixture and squeeze to get all the "milk" out.
* Keep it in the fridge.


Enjoy!


Louise