Saturday, 28 December 2013

Daring Bakers - December 2013!

Well, after two whole months of not participating to the DB Challenges, I must say I was really really happy and excited to make Whoopie Pies!!!

Yes, Whoopie Pies. A lovely challenge hosted by the very talented Bourbonnatrix!

I used the given recipe for chocolate Whoopie Pies, only I made them more chocolatey by adding melted milk chocolate and a little espresso coffee, very little, maybe half a shot.
For the filling I already had some Swiss Meringue Buttercream in the freezer, which I thawed and flavoured with maple syrup.

I simply adore the combination of chocolate and maple!

Whoopie Pies

115 gr butter
1/2 shot espresso coffee
200 gr brown sugar
5 gr baking powder
3 gr baking soda
5 gr salt
a pinch of vanilla
1 egg
45 gr cocoa
285 gr all purpose flour
240 ml milk
100 gr melted chocolate

* Preheat the oven to 180oC. Line your baking sheets with parchment paper.
* Beat butter, sugar, baking powder, baking soda, salt and vanilla until smooth.
* Add the egg and beat smooth again.
* Add the cocoa and mix gently.
* Pour the coffee and mix until incorporated.
* Add the melted chocolate and mix well.
* Add flour and milk in turns and mix until smooth and incorporated.
* On the prepared sheets drop balls of dough, how big, well it depends on how big you want your whoopie pies.
* Bake for about 15 minutes until they are firm to the touch.
* Remove from the oven and cool for 10 min on the sheets, then remove them with a spatula and let them cool completely, before you fill them.

The batter is rather thick.
I made balls using two tablespoons.


I piped the filling, so that it would look prettier!
.

After making these, I realised that they resemble a Greek treat called "kok", which comes in individual portions and in bite sizes. The difference is that while "kok" is a vanilla cake with vanilla filling and chocolate glaze on top, the whoopie pie can be found in so many flavor combinations!

This is what I really like about them, the versatility.

I am certainly going to make them again, bite size this time!


Thank you Bourbonnatrix for a great challenge!

Louise!

Tuesday, 17 December 2013

Orange sweet rolls!

I like yeast dough.

Even though it is difficult, the yeast may not react, you have to wait, etc., the result when it comes to taste and texture is so good!

I made orange sweet rolls for brunch, using a recipe, which can also act as a base for cinnamon rolls, chocolate rolls and so on.
In fact, after making cinnamon rolls with no yeast, I wanted to find a nice recipe for cinnamon rolls with yeast and I believe my search is over!

Orange sweet rolls
recipe adapted from here

dough:
21gr active dry yeast
375gr warm water
120gr honey
120gr butter melted
3tsp salt
2 eggs beaten
600gr flour + more if needed

filling:
125gr butter soft
225gr sugar
4tbsp fresh orange juice

glaze:
500gr icing sugar
5 tbsp fresh orange juice
110gr creme fraiche

* Preheat the oven to 110oC, then turn it off.
* Combine the warm water with the yeast in the bowl of your mixer. Allow it to sit for 5 min, until it bubbles.
* Add honey, melted butter, salt, eggs and mix them well.
* Slowly add 450gr flour, using the dough hook. The dough will be wet.
* Start adding more flour until the dough pulls away from the sides of the bowl and is sticky. Put a finger in the dough. If it sticks, but does not pull any dough, it is OK.
* Cover it with plastic wrap and place it in the warm OFF oven.
* It must double in size, about 40-45 min.
* After it has risen, punch it down and roll it to a rectangle sheet. Spread the filling and roll tightly, from the long end.
* Cut rolls about 3cm thick and place them in a buttered pan.
* Cover with a towel and place back in the warm OFF oven to rise for a second time, about 20-30 min.
* Now preheat the oven to 180oC and bake the rolls for 25 min.
* Drizzle the glaze over the warm rolls!

* For the filling mix everything together.

* For the glaze combine everything together and adjust for consistency.


Mmmm, they smell so good!


Soft and fragrant and tasty, these rolls are a treat!


Louise

Thursday, 12 December 2013

Cake batter cookies!

I made a coconut cake and there was some left over batter. The cake pan was full, so I thought to my self, let's bake a few cupcakes as well. This is what I usually do with the left over batter.

This time, I had the sudden idea to turn the batter to dough. I simply added 1 cup all purpose flour and some more coconut. The result was not your typical cookie dough, but it was rather pliable.

Since, you can't roll this type of dough, I formed it in balls and placed them in a pan with holes in a flower design and pushed them to cover the bottom. I baked them and this is the result:


They are soft inside and crunchy on the outside. Quite tasty and a great alternative to baking cupcakes!


Louise

Wednesday, 4 December 2013

Cookie dough stuffed cupcakes!

Cookie dough is one of my favourite things. Well, eggless raw dough.
I don't care much for raw egg....

I baked vanilla cupcakes, but instead of plain white sugar, I used dark brown sugar.
I prepared the cookie dough, formed small balls to fit the cupcake cases and placed them in the friezer.

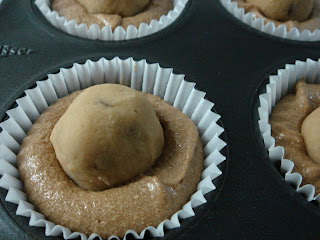
What I did was to drop some cake batter in the cases and place a frozen dough ball in the middle. While the cupcakes are baked, the batter rises and covers the ball.


I love these close-ups...
Yes, I did eat a few balls, while making them!
Brown sugar cake.

Fresh from the oven!

Some formed air pockets...

Great taste, great idea!
If you can actually resist eating the cookie dough...


Louise

Thursday, 28 November 2013

Homemade Playdough!

Whenever I can, I make, create, bake, etc.
I believe that it is healthier and safer, when it comes to things for my child.

She likes playing with playdough, but the store bought is sticky, smelly, can't be cleaned properly from furniture and fabric and what if she swallows a piece?

So, I searched the web (well, Pinterest really!) and found a recipe, which I adapted to suit me.

Homemade Playdough
adapted from here

1 cup flour
1 cup water
2 tsp cream of tartar
1/3 cup salt
1 tbsp olive oil
1 tsp vanilla extract
food colouring

* Mix all the ingredients, except the colour in a pot.
* Cook over low heat, stirring until it thickens.
* When it starts to gather around the spoon, remove the dough onto parchement paper.
* Wait a bit until you can handle the temperature and divide it into as many balls as you want to colour variate.
* Add little drops of colour and knead until you get the olour you want.
* Place them in food containers with lids.

Note that if left uncovered long, the dough will dry.

It is very easy to handle and you, ah hem ... your child will love to play with it!
.
.
.
.
.

Wednesday, 13 November 2013

Peach sorbet!

If you like fruit sorbet, then this is for you. Fast, easy, low fat and oh so tasty!

I came up with it, while I was trying to figure out, what I was going to do with so many peaches that I had. I made peach jam, but I also wanted something else...

Peach sorbet

fresh, ripe peaches
sweetener or regular sugar, quantity to your taste
1 tbsp lemon juice
1 tsp vanilla extract

* Wash and remove the skin pf the peaches.
* Cut them in little cubes.
* Spread them on a baking tray lined with parchment paper.
* Place the tray in the freezer, until the fruit is totally frozen.
* Place all the ingredients in the food processor and blitz your heart out.
* From time to time, stop and scrape down the sides.
* It is ready when it looks like sorbet!


You will love this. Trust me!


Louise

Tuesday, 5 November 2013

Zucchini dinner!

This is a dinner option I make for myself a lot. G doesn't like it very much, so, well..., more for me!

It is also South Beach Phase I suitable!

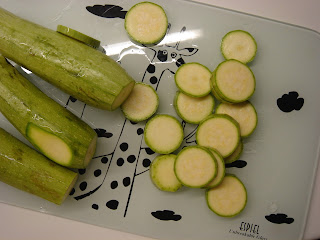
Cut the zucchini very thin.
Drizzle with olive oil.
Add some ready mix (I use a spicy one for meats).
 Add some tomato paste.
Toss the pieces gently.
 Bake for 20 min. until crispy in a preheated oven 180o C.
 Once out of the oven throw some light grated cheese on top and let it melt.


Very easy. Very tasty. Really quick to make!

Louise

Monday, 21 October 2013

Sugar cookies filled with chocolate cookie dough.... Come again?

I don't know what to say about the title of this post. Sugar cookies, cookie dough, really.... I have no comments.
I simply drool looking at the pictures!

Inspired by a cook book by Lindsay Landis called "Cookie Dough lover's cookbook", I baked my sugar cookies and filled them with an amazing raw chocolate cookie dough.

Last time I made something from this lovely book was for a Daring Bakers challenge in July 2013, when I made two different candies: chocolate chunk cookie dough fudge and peanut butter cookie dough cups!

Baked sugar cookies with raw chocolate cookie dough filling

Filling: chocolate cookie dough
slightly adapted

115gr butter
60gr white sugar
100gr brown sugar
2 tbsp milk
vanilla extract
110gr all purpose flour
60gr cocoa powder
1/2 tsp salt

* Beat butter and sugar until fluffy.
* Mix in vanilla and milk.
* Stir in gently flour, cocoa and salt.
* Ready!

I baked sugar cookies using my trusted recipe. When they were totally cool, I took 1 teaspoon of dough, rolled it into a ball and placed it on a cookie, baked side down. Then I placed one cookie on top and pressed.
It is that easy!


They are so good!

Louise

Wednesday, 16 October 2013

Whole wheat muffins with fruit!

I have a recipe for muffins, that I use all the time, especially when I want a quick breakfast (in the car while driving to work....) with low sugar.
The good thing about this recipe is that you can add any kind of fruit you like, fresh, dried, even nuts!

Low sugar whole wheat muffins

165gr whole wheat self rising flour
3 tsp baking powder
1/2 tsp cinnamon
2 tbsp brown sugar
2 eggs
60gr butter
150gr milk
225gr grated fresh fruit
100gr dried fruit

Just mix everything together.
Bake in a preheated oven 190o C for about 20 minutes.


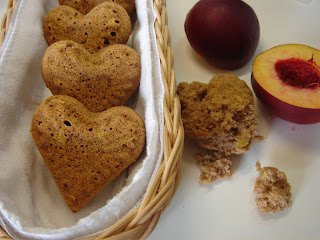
The ones in the picture have grated nectarine.
A combination that I love is with grated pear and raisins.

Also if you add synthetic sweetener instead of sugar, you can have muffins suitable for South Beach Phase II.

Did I mention they are super fast to make? And super tasty?


Louise

Friday, 27 September 2013

Daring Bakers - September 2013!

What a great challenge this month!

I was delighted to see that we had to bake a Tres Leches Cake! I see this kind of cake all over the internet and I was intrigued to make it and taste it! Plus, I didn't take part in the August challenge and I really missed it!

The chalenge was chosen by Inma from La Galletica. Inma gave us information and some options. I searched it a bit on Pinterest and found more variations.
I was between a vanilla and a chocolate tres leches cake, but I thought that the taste of the milks "syrup" would show best with a vanilla cake. Right, wrong? I guess I will have to make a chocolate one at some point, just to compare.

The recipe I used was easy and fast to prepare, i.e. you don't have to separate the eggs. I also used only the  whipped cream for topping, no fruit.

Classic tres leches cake with Salted whipped cream
recipe adapted from here

cake:
165gr all purpose flour
1 1/2 tsp baking powder
1/2 tsp salt
115gr butter
220gr sugar
4 eggs
2 tsp vanilla extract

milk "syrup":
150 ml sweetened condensed milk
150 ml evaporated milk
100 ml heavy cream

salted whipped cream:
200 ml heavy cream
60 gr confectioner's sugar
1 tsp vanilla extract
1/2 tsp salt

* Preheat the oven to 180oC.
* Mix flour, baking powder and salt.
* Mix butter and sugar and beat until fluffy.
* Add eggs, one at a time, mixing well after each one.
* Add in vanilla.
* Add the flour mixture and beat until just combined.
This cake is thin. Think "sheet cake thin". So when your batter is ready, choose a pan at the appropriate size and line it with parchment paper.
* Pour batter in and smooth it.
* Bake for 30 min. untill a tester skewer comes out clean.

* 10 min. before the cake is out of the oven, prepare the milk syrup:
* Put the milks and cream in a small pot and bring to a boil. Reduce heat and boil for about 5 min. stirring constantly.
* Take the cake out of the oven, remove the parchment paper genlty by turning it upside down and then put it back in the pan and prick it all over with a fork (Be careful!).
* Pour the milks over the cake.
* Let it cool very well and then put it in the fridge overnight.

* For the whipped cream, beat all the ingredients until stiff peaks form.
* Spread the whipped cream over the cake and serve.


A few notes please:
- We tasted the cake before it was cooled.... Warm, sweet cake smelling delicious... There was no way we could wait!
- The rest of the cake did go into the fridge and it was amazing the next day! Cold and moist... OMG!
- I decided to make a salted whipped cream, because the cake is very sweet and I wanted some balance, which, I am happy to admit, I achieved. Just don't overdo it with salt. Go slowly and taste along the way to see where you are OK with the saltiness.
- The cake never made it to the afternoon...
- I am imagining a layer cake with thes leches cake layers and vanilla or maple whipped cream in between!
- My sister is crazy about this cake!

Thank you Inma! I really enjoyed this challenge!

Louise